Replacing a shower arm might seem like a daunting task, but with the right tools and guidance, it’s a straightforward project any homeowner can tackle. Whether you’re upgrading to a more stylish fixture or dealing with leaks and rust, this guide will walk you through the steps to replace a shower arm confidently. Plus, you’ll learn how to select the best shower arm for your bathroom setup and avoid common issues along the way.
Can You Replace a Shower Arm on Your Own?
Homeowners might need to replace a shower arm for various reasons—rust buildup, leaking connections, or simply upgrading bathroom fixtures. Fortunately, this task doesn’t require advanced plumbing skills, making it a perfect DIY project for those looking to improve their bathroom without hiring a professional.
In this guide, you’ll find easy-to-follow steps for replacing a shower arm, plus expert tips for choosing the right one for your setup. By the end, you’ll know how to handle the entire process, from removing the old arm to ensuring your new shower arm and head are a perfect fit.
Step-by-Step Guide to Replacing a Shower Arm
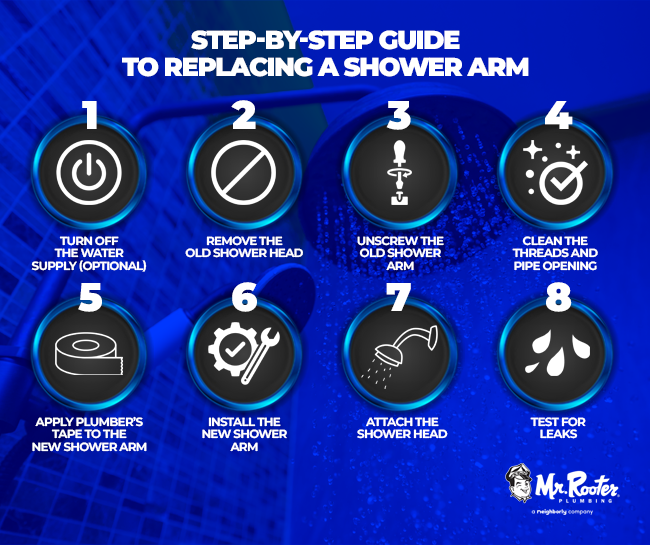
Step 1: Turn Off the Water Supply (Optional)
While it’s not always necessary to turn off the main water supply for this project, it’s a good idea to ensure no water will flow through the pipes while you work. Simply make sure the shower is off and that no one in the house is using water that might disrupt the project.
Step 2: Remove the Old Shower Head
Start by removing the shower head from the existing arm. Use an adjustable wrench to gently loosen the head by turning it counterclockwise. If the head doesn’t come off easily, apply light pressure, but be cautious not to scratch or damage it. Once unscrewed, set the shower head aside to use later or replace it with a new one.
Step 3: Unscrew the Old Shower Arm
Next, unscrew the shower arm from the wall fitting. This can usually be done by hand, but if it’s too tight, use your wrench. Turn the arm counterclockwise to loosen it.
💡 Pro Tip: Wrap a cloth around the arm to avoid scratching it if you’re using a wrench for removal.
Step 4: Clean the Threads and Pipe Opening
Once the old arm is removed, take a moment to inspect and clean the threads on the pipe inside the wall. Remove any remnants of plumber’s tape or debris that could interfere with the installation of the new arm. Check for signs of rust or corrosion, which may need to be cleaned or addressed before proceeding.
Step 5: Apply Plumber’s Tape to the New Shower Arm
Before installing the new shower arm, wrap the threads with plumber’s tape to ensure a watertight seal. Two to three wraps should be sufficient to prevent any leaks. Make sure the tape is snugly wrapped and smooth, with no loose ends.
Step 6: Install the New Shower Arm
Insert the new shower arm into the wall fitting, turning it clockwise to screw it into place. Begin by hand-tightening the arm, ensuring it goes in straight. Once secure, use the wrench to tighten it further, but don’t over-tighten as this could cause damage. Tip: If your shower arm has a curve or angle, make sure it’s positioned correctly for proper function and aesthetics.
Step 7: Attach the Shower Head
Now, it’s time to reattach the shower head. Apply plumber’s tape to the threads of the shower head, just as you did with the arm. Screw the head onto the arm by hand, and use the wrench for a final light tightening. Again, be cautious not to overtighten, as this could cause leaks or damage the threads.
Step 8: Test for Leaks
Turn on the water and test your new setup. Check both the shower arm connection and the shower head for any leaks. If you notice any, try tightening the connections slightly or adding more plumber’s tape to the threads for a better seal.
Types of Shower Arms and How to Choose the Right One
Choosing the right shower arm is just as important as knowing how to replace it. Shower arms come in various styles, each designed for different purposes and aesthetics. Here’s a breakdown of the most common types:
Are Shower Arms Easy to Replace?
Yes, most shower arms are designed for easy DIY replacement. As long as your new shower arm is compatible with your current plumbing setup, the replacement process should be quick and straightforward.
Do Shower Arms Fit All Shower Heads?
Most shower heads and arms use a standard ½-inch thread, making them universally compatible in most cases. However, it’s always wise to check the specifications of both your shower arm and shower head to ensure they will fit together seamlessly.
What Type of Shower Arm Do I Need?
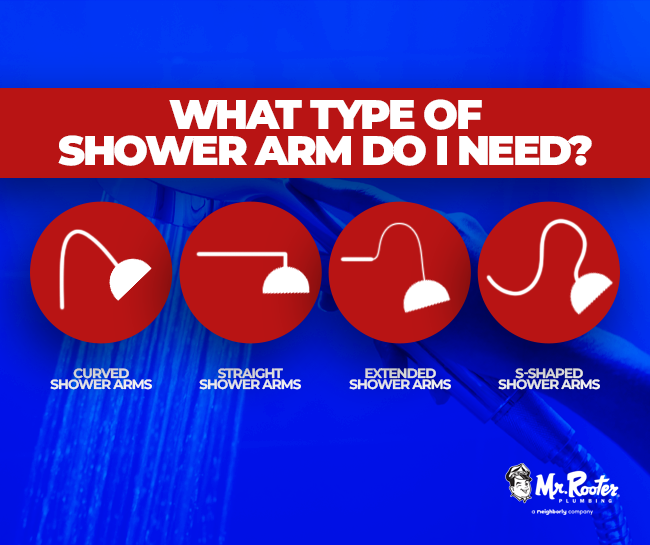
- Curved Shower Arms: Ideal for rain shower heads, these arms offer more space and give a luxurious feel to your showering experience.
- Straight Shower Arms: The standard arm for typical shower heads, offering a simple, no-fuss design.
- Extended Shower Arms: Perfect for those who need more height or reach, these arms can make the shower more comfortable for taller users.
- S-Shaped Shower Arms: These add both height and elegance, providing a more sophisticated look while also improving the functionality of your shower space.
💡 Replacing outdated fixtures allows for a fresh look and feel in the space, enabling individuals to express their style while enhancing functionality.
Common Issues and Troubleshooting Tips
Even with the right tools and approach, you may run into some common issues while replacing your shower arm. Here are a few solutions to help you troubleshoot:
Shower Arm Won’t Unscrew
If your old shower arm is stuck, try applying heat using a hairdryer to loosen the threads. You can also use a penetrating oil to break up any rust or mineral deposits that might be causing the arm to stick.
New Shower Arm Leaking
If you notice a leak after installing the new arm, double-check the amount of plumber’s tape applied to the threads. Too little tape can lead to leaks, while over-tightening can damage the threads and cause similar problems.
Shower Arm Doesn’t Fit the Shower Head
If your new shower arm doesn’t seem to fit the shower head, verify the thread sizes. Most arms and heads use a ½-inch thread, but occasionally you may encounter a mismatch if one of the components is a non-standard size.
When to Call a Professional
While replacing a shower arm is generally a DIY-friendly project, there are certain situations where it’s best to consult a professional plumber:
- Stubborn or Rusted Shower Arm: If you can’t remove the old shower arm or are dealing with severe rust and corrosion, a plumber can safely handle the job without damaging your fixtures.
- Leaks in the Wall: If you notice water leaking behind the wall or from areas other than the connections, there may be a deeper issue with your plumbing that requires expert attention.
Replacing a shower arm can be a quick and rewarding DIY project for homeowners. By following these steps and ensuring the right fit between your shower arm and head, you can enjoy a refreshed shower experience with minimal effort. And remember, if you encounter any major issues or feel unsure about tackling the job yourself, don’t hesitate to contact a professional plumber for assistance.